Virtualization with libvirt
For the realization of this practice you will need an Ubuntu Cloud image that we will download from https://cloud-images.ubuntu.com/ and we will need a host system with Ubuntu 18.04.
In this practice we will use the image downloaded from the Ubuntu Cloud website and we will use the cloud-init tool to configure it.
Next, we will use the Ubuntu image already configured to be imported to the virtualization software libvirt'.
Contenido
- 1 Step 1: Downloading the Ubuntu Cloud image
- 2 Step 3: Installing the libguestfs package
- 3 Step 3: Configuring the Ubuntu image with virt-customize
- 4 Step 3: Installing the libguestfs package
- 5 Step 3: Configuring the Ubuntu image with virt-customize
- 6 Step 4: Installing libvirt and importing images
- 7 Step 5: Configuring the network in libvirt
- 8 Step 6: Cloning of virtual machines
- 9 Step 7: Snapshots of virtual machines
- 10 Step 8: Manual installation of Linux
- 11 Step 9: Manual Windows installation
- 12 Exercise 1 (2021-11-26)
Step 1: Downloading the Ubuntu Cloud image
We enter https://cloud-images.ubuntu.com/ and download the Ubuntu 18.04 LTS (Long Time Support) image.
You can download it directly with the command wget:
wget https://cloud-images.ubuntu.com/bionic/current/bionic-server-cloudimg-amd64.imgif it started downloading you will see output similar to this:
-2019-08-06 12:26:26-- https://cloud-images.ubuntu.com/bionic/current/bionic-server-cloudimg-amd64.img
Resolving cloud-images.ubuntu.com (cloud-images.ubuntu.com).... 91.189.88.89, 2001:67c:1560:8001::8001
Connecting to cloud-images.ubuntu.com (cloud-images.ubuntu.com)[91.189.88.89]:443... connected.
HTTP request sent, waiting for response... 200 OK
Length: 343474176 (328M) [application/octet-stream] [application/octet-stream] [application/octet-stream]...
Saving to: "bionic-server-cloudimg-amd64.img"

bionic-server-cloudimg-amd64.img. 0%[ ] 2.21M 472KB/s eta 14m 6s
Wait until the image is 100% downloaded.
The Ubuntu cloud image comes with 2 GBytes of space by default, you can expand the size with the following command before using it in the virtual machine:
qemu-img resize bionic-server-cloudimg-amd64.img +8GThis increases the image by 8 Gbytes, so you are left with a 10 GByte Ubuntu cloud image.
Step 3: Installing the libguestfs package
Next, you have to install the packages that provide the virt-customize tool to configure the Ubuntu image you downloaded.
We can install these packages with the apt' tool from the shell.
For Ubuntu 18.04:
sudo apt install libguestfsFor Ubuntu 20.04:
sudo apt install libguestfs-toolsOn the practice classroom computers these packages will already be pre-installed, so you can skip this step.
Step 3: Configuring the Ubuntu image with virt-customize
The virt-customize command allows you to set the password of the administrator user of the image we have downloaded.
virt-customize -a bionic-server-cloudimg-amd64.img --root-password password:coolpassThe above example shows how to configure the downloaded image to have the user root, and in this case, the password is coolpass.
For the realization of this practice you will need an Ubuntu Cloud image that we will download from https://cloud-images.ubuntu.com/ and we will need a host system with Ubuntu 18.04.
In this practice we will use the image downloaded from the Ubuntu Cloud website and we will use the cloud-init tool to configure it.
Next, we will use the Ubuntu image already configured to be imported to the virtualization software libvirt'.
= Step 1: Downloading the Ubuntu Cloud image
We enter https://cloud-images.ubuntu.com/ and download the Ubuntu 18.04 LTS (Long Time Support) image.
You can download it directly with the command wget:
wget https://cloud-images.ubuntu.com/bionic/current/bionic-server-cloudimg-amd64.imgif it started downloading you will see output similar to this:
-2019-08-06 12:26:26-- https://cloud-images.ubuntu.com/bionic/current/bionic-server-cloudimg-amd64.img
Resolving cloud-images.ubuntu.com (cloud-images.ubuntu.com).... 91.189.88.89, 2001:67c:1560:8001::8001
Connecting to cloud-images.ubuntu.com (cloud-images.ubuntu.com)[91.189.88.89]:443... connected.
HTTP request sent, waiting for response... 200 OK
Length: 343474176 (328M) [application/octet-stream] [application/octet-stream] [application/octet-stream]...
Saving to: "bionic-server-cloudimg-amd64.img"

bionic-server-cloudimg-amd64.img. 0%[ ] 2.21M 472KB/s eta 14m 6s
Wait until the image is 100% downloaded.
The Ubuntu cloud image comes with 2 GBytes of space by default, you can expand the size with the following command before using it in the virtual machine:
qemu-img resize bionic-server-cloudimg-amd64.img +8GThis increases the image by 8 Gbytes, so you are left with a 10 GByte Ubuntu cloud image.
Step 3: Installing the libguestfs package
Next, you have to install the packages that provide the virt-customize tool to configure the Ubuntu image you downloaded.
We can install these packages with the apt' tool from the shell.
For Ubuntu 18.04:
sudo apt install libguestfsFor Ubuntu 20.04:
sudo apt install libguestfs-toolsOn the practice classroom computers these packages will already be pre-installed, so you can skip this step.
Step 3: Configuring the Ubuntu image with virt-customize
The virt-customize command allows you to set the password of the administrator user of the image we have downloaded.
virt-customize -a bionic-server-cloudimg-amd64.img --root-password password:coolpassThe above example shows how to configure the downloaded image to have the user root, and in this case, the password is coolpass.
Step 4: Installing libvirt and importing images
First, install libvirt on the system:
sudo apt install libvirt-clients libvirt-daemonOn the practice classroom computers this package will already be pre-installed, so you can skip the above command..
To create a virtual machine with libvirt, you have to make use of virt-install:
virt-install --name mi-mv --memory 2048 --disk path=/home/user/bionic-server-cloudimg-amd64.img --network network=default --os-variant ubuntu18.04 --importIn the above command:
- A virtual machine named my-mv is created.
- The memory of the virtual machine is 2 GBytes (2048 Mbytes).
- The --disk path indicates the path to the Ubuntu Cloud image.
- The default network configuration is used.
- The operating system variant of Ubuntu 18.04 is specified.
- Indicate that this is an import of an image with an operating system already installed using --import.
''Remember to modify the virtual machine name my-mv and update the path to the Ubuntu Cloud image you downloaded in the previous step'.
After invoking this which will bring up the virtual machine screen in a window, you can exit the screen by clicking on File -> Quit.
To access the virtual machine screen again at any time, you can do:
virt-viewer mi-mvTo stop the virtual machine:
virsh shutdown my-mvTo list the existing virtual machines and check their status:
virsh list --allYou can use grep to locate your virtual machine and show the state it is in.
virsh list --all | grep my-mvTo launch a shutdown virtual machine, you can use:
virsh shutdown mi-mvIf you need to wipe a virtual machine completely (previously shutdown), you can do it with:
virsh undefine mi-mvafter which it will no longer appear in the virsh list --all listing.
Alternatively, libvirt provides the graphical interface 'virt-manager', which can be installed from the shell:
sudo apt install virt-managerOnce installed we can launch virt-manager from the shell:
virt-managerFrom the virt-manager GUI, we create a new virtual machine using the Ubuntu image we downloaded in step 1 and the image generated by cloud-localds in step 3.
- From the virt-manager interface we create a new Virtual Machine (File --> New virtual machine)'.
- In the new window that opens, select Local installation media and click Go.
- In Choose ISO or CDROM install media we select the media.img image created in step 3; and uncheck the box Automatic detection to select our Operating System, in this case, Ubuntu 18.04 LTS. We see that everything is as in the image and click Go ahead. You can use the Browse locally button to locate the file. ]Archivo:Virt-manager-step4-3.pngChoose configuration image and OS
- We select the amount of memory and CPU we want, by default 2048 Memory and 1 CPU is fine.
- In the storage, let's select a custom storage, and this is where we select the downloaded ubuntu image, in our case bionic-server-cloudimg-amd64.img and click Go. You can use the Browse locally button to locate the file.
- In the last step, we can select the network, for now we will leave NAT by default and click Finish' (If it asks us if we want to create a network NAT because it is not created, we say yes).
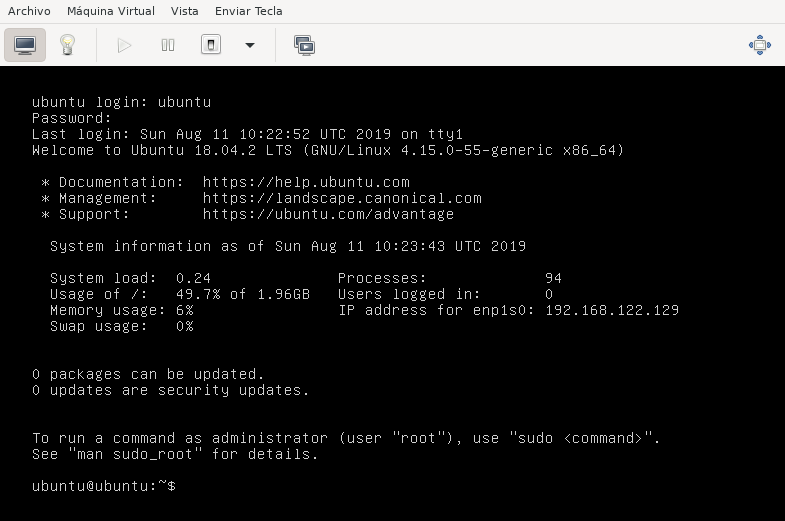
We already have our virtual machine created with our configuration. Now we are going to test that everything works correctly. The machine should be booting and the login message should appear. [File:virt-manager-login.png|thumb|Login for ubuntu.
We use as user ubuntu, which is the default user and as password we use the one we have chosen in step 3. With this we validate successfully in the system. ]We already have a shell in our Ubuntu cloud operating system running on our virtual machine.
'Note: The keyboard of the Ubuntu cloud image running on the virtual machine is in English, you can change it with the following command:
sudo loadkeys enStep 5: Configuring the network in libvirt
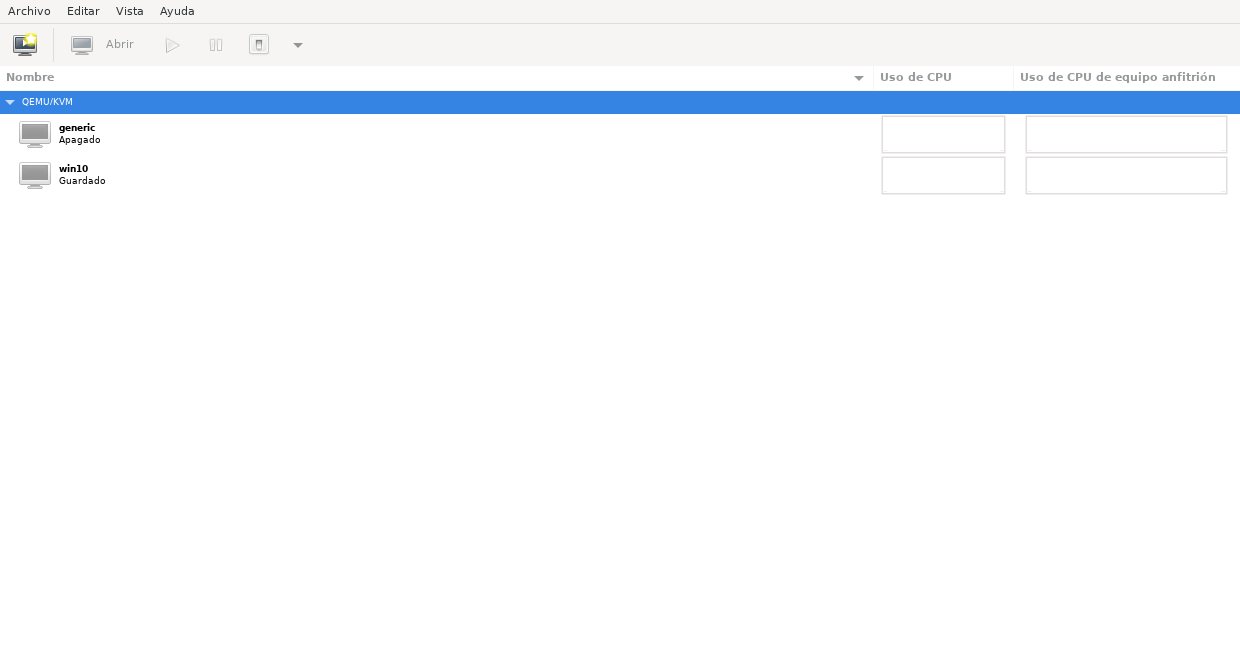
Before we look at the network details, let's make a small difference between the two windows we have open, virt-manager main and virt-manager ubuntu machine running. In the first one we will have the general configurations and in the second one we will have the configurations of a specific virtual machine, in our case, the configuration of the ubuntu virtual machine.
With this, we will see two ways to know the IP of our virtual machine:
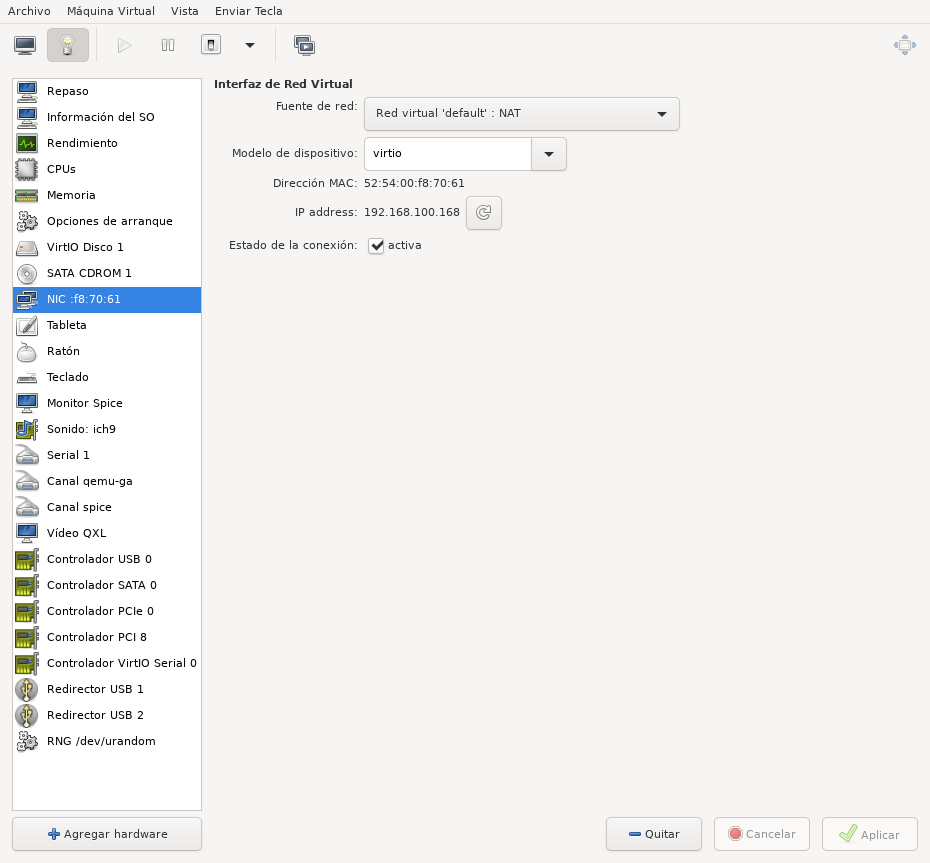
- In the window of our ubuntu virtual machine, let's change the view and see the details of our machine. View --> Details. Here we have all the configuration of our machine, but we are only going to focus on the Virtual Network Interface, which is where we will be able to see which is the IP address of our machine and which is the network source that is being used. ]
- The other option is using commands, we can use ip address in the console of our virtual machine.
$ sudo ip address
1: lo: <LOOPBACK,UP,LOWER_UP> mtu 65536 qdisc noqueue state UNKNOWN group default qlen 1000
    link/loopback 00:00:00:00:00:00:00:00:00:00:00:00:00:00:00:00 brd 00:00:00:00:00:00:00:00
    inet 127.0.0.1.1/8 scope host lo
       valid_lft forever preferred_lft forever
    inet6 ::1/128 scope host
       valid_lft forever preferred_lft forever
2: ens3: <BROADCAST,MULTICAST,UP,LOWER_UP> mtu 1500 qdisc pfifo_fast state UP group default qlen 1000
    link/ether 3d:f0:ee:49:aa:22 brd ff:ff:ff:ff:ff:ff:ff:ff
    inet 192.168.100.168/24 brd 192.168.2.255 scope global eth0
       valid_lft forever preferred_lft forever
    inet6 fe80::3e97:eff:fe39:dd20/64 scope link
       valid_lft forever preferred_lft forever
Which allows us to check that we are using the IP address 192.168.100.168.
If the interface does not show an IP address, you can force an IP address to be obtained from the virtual machine for the ens3 interface with the command:
sudo dhclient ens3Let's check now from a terminal on the host that we reach our virtual machine.
ping 192.168.100.168We should see output similar to the following:
PING 192.168.100.168 (192.168.100.168) 56(84) bytes of data.
64 bytes from 192.168.100.168: icmp_seq=1 ttl=64 time=0.397 ms
64 bytes from 192.168.100.168: icmp_seq=2 ttl=64 time=0.409 ms
64 bytes from 192.168.100.168: icmp_seq=3 ttl=64 time=0.321 ms
If there were any connectivity problems the output would look like this:
PING 192.168.100.168 (192.168.100.168) 56(84) bytes of data.
From 192.168.100.1 icmp_seq=1 Destination Host Unreachable
From 192.168.100.1 icmp_seq=2 Destination Host Unreachable
From 192.168.100.1 icmp_seq=3 Destination Host Unreachable
In such a case, you can force an IP address to be obtained with the command:
sudo dhclient ens3This means that the network configuration is incorrect, or perhaps that the IP address of your virtual machine is not 192.168.100.168 :-).
More information about network configuration in libvirt is available.
Step 6: Cloning of virtual machines
We are going to reuse the configuration and the created virtual machine, to create several identical ones. Let's start:
- We turn off the virtual machine if we have it on, to allow us to make a clone. Virtual machine --> Shutdown --> Shutdown.
- In the main window, right click on the virtual machine that we want to clone, and click Clone ...'
- In the window that appears, by default it will select the same network and create a different MAC for the new machine and clone the ubuntu image that we use for storage. We give a new name to our machine, and click on Clone.
- We repeat this step until we have all the desired virtual machines, in our case, we will only create one to test the network details.
Now we will start the original machine and the cloned one, and we will verify that both are in the same network and that they can see each other. As we commented in the previous step, we will check the IP of the original virtual machine and the cloned one, and we will ping from inside the machines to check that they can see each other.
Example:
- Original machine has IP 192.168.100.168.
- Cloned machine has IP 192.168.100.169
- From the original machine we will do a ping 192.168.100.169
- From the cloned machine we will ping 192.168.100.168
- From both machines, we will check that the gateway is the same, doing an ip route.
- From the host machine, we should ping both machines.
Step 7: Snapshots of virtual machines
Snapshots allow us to store a snapshot of the running state of a virtual machine at a certain point in time that we can restore when necessary. The snapshots will be useful if you have work half done in the virtual machine, so that you want to save what you have done to restore it later.
To create a snapshot, we access to the virtual machine in execution and we deploy the menu View and click on Screenshots (Snapshot). Then click on the + button that appears at the bottom left, indicate the name of the snapshot and click on Finish.
The creation of snapshots takes some time, be patient. You can store as many snapshots as you want. The name Screenshot is an unfortunate translation of snapshot which refers to the term snapshot.
Step 8: Manual installation of Linux
In addition to installing from the Ubuntu Cloud image, it is possible to perform an installation from scratch by making use of the Ubuntu installer. This process is slower than using the Ubuntu Cloud image.
Download the Ubuntu minimal CD image
The first thing is to download the Ubuntu installer image:
wget http://archive.ubuntu.com/ubuntu/dists/bionic/main/installer-amd64/current/images/netboot/mini.isoCreating the virtual hard disk
You have to create a virtual hard disk that is initially empty:
qemu-img create -f qcow2 server-base.qcow 5GAfter this we have a hard disk with a capacity of 5 GBytes to use in a virtual machine.
Creation of the virtual machine
- Select local installation media (ISO image or CDROM) and select the mini.iso image which is the file we downloaded and contains the Ubuntu installer image.
- Select select custom storage and select the file server-base.qcow2 which contains the virtual image (we created it earlier).
Manual Ubuntu step-by-step installation
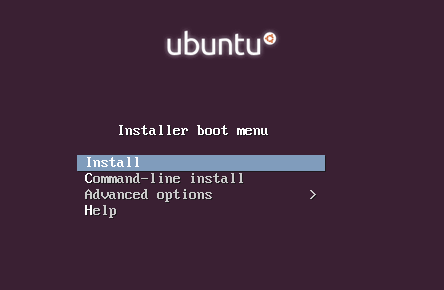
]- Once the Ubuntu installer starts, select Install and hit the enter key.
- Keyboard configuration: We select the language and the Spanish keyboard (or any other we prefer). In the keyboard selection, we recommend to indicate that no performs the autodetection of the keyboard, so that you select manually the type of keyboard that you have.
- Replication repository selection: We indicate Spain to make use of the repository that contains the Ubuntu software catalog closest to us, so that the download times are as short as possible.
- Selection of user name and account: You specify the name you want, as well as a password.
- Time zone selection: Select Spain and indicate that we are in the Peninsula.
- Partitioning method: We select guided because it is the simplest, and we use the whole disk. It will show us a virtual disk (vda) of 5 Gbytes (or what we have selected when creating the virtual disk with qemu-img).
- ... after this starts the installation of the base system ... (it takes a while)
- Manage updates: We select no automatic updates, we will select the right time to update the system as we know how the package management system apt works.
- Programs to install: We do not select any of the thematic package groupings to reduce the installation time, and we continue.
- GRUB: We indicate that we want to install it, because it is the boot loader (without it, the virtual machine will not boot!).
- Selection of the UTC time, we indicate yes.
After this we have completed a manual Ubuntu installation.
Step 9: Manual Windows installation
- Downloading the evaluation version of Windows: windows evaluation
Exercise 1 (2021-11-26)
1. Create 2 Virtual Machines with the same image 2. Install the package "netcat" in both 3. Create a netcat server in VM1 using
nc -l -p80004. Connect to said server in VM2 using
nc IP_VM1 80005. Install openssh-server in VM1 and openssh-client in VM2


